There is a handy feature in Microsoft Outlook that allows you to share your calendar with anyone. If you work collaboratively with others, everyone on the list can view your schedule, keeping everything organized.
It is also possible to control how much access other users have to your schedule. Users can have full access to your calendar or only access to basic information. We will describe how to share your Outlook calendar with others in this article. Could you continue reading to learn how to do it?
Sharing Your Outlook Calendar
Different versions of Outlook are available for different platforms, including:
- The Microsoft Office Suite Outlook application
- The web client
- The mobile application of Outlook.
Each of these clients has the ability to share calendars. Here are some ways to share your Outlook calendar:
Sharing Calendar on Outlook Using the Desktop Application
There are multiple versions of Office for Windows, which means that each version differs slightly from the others. Regardless of which version you are using, the steps are the same irrespective of the interface. We will use Outlook in Office 2019 in the examples. Follow these steps to set up desktop calendar sharing in Outlook:
- Sign in to your Outlook account on the desktop. You will be taken to the Outlook main page to see your emails. Go to the calendar page by clicking on the Calendar icon in the bottom left corner.
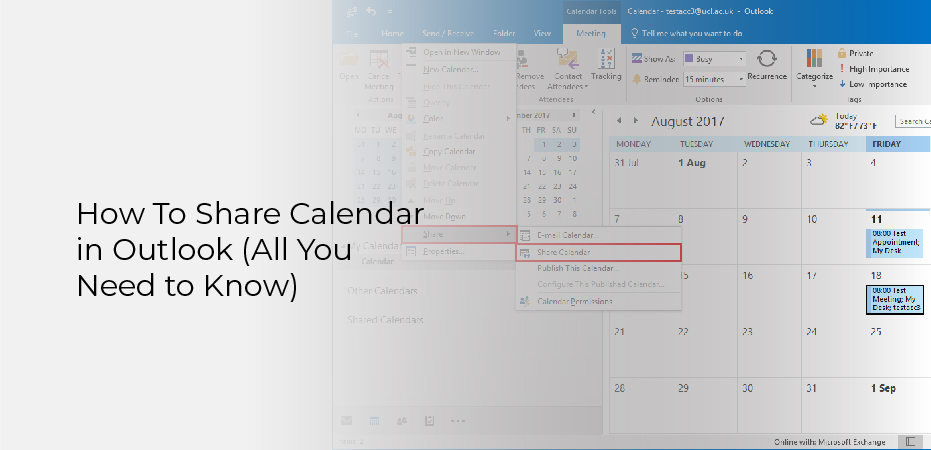
- Once you have edited your calendar (if it needs to be done), click on Home at the top of the page and select the Share option. Select the method you wish to use to share your calendar.
- You can choose from several ways to share your calendar in the Share section. The Email Calendar is what we will use in this article. Select the calendar option before sending.
- When you click the option, a window opens that allows you to specify calendar information. Select the Date Range option. If you choose to select a time range, your recipient will be able to see it.
You can control how much detail you want to share with your recipient by clicking on the Detail tab. You have the following options:
- Show only availability
- Limited details
- Full details.
You can select any option you like and confirm your selection by clicking OK. The compose email window will show your calendar attached. Send the email by typing the recipient’s email address into the textbox, then click Send.
How To Use the Web Version of Outlook to Share the Calendar?
You can share a calendar in Outlook for the web by following these steps:
- Log in to your account by visiting outlook.live.com. The Outlook web interface will open with the Mail tab highlighted. On the left-hand side of the page, click on the Calendar Icon.
- Change the calendar as desired. In the top right corner of the screen, click the Share button. The Share window will appear.
- You will be asked to enter the recipient’s email address or contact name in the text box in this smaller window.
- The recipient’s permissions can be set once you input the recipient’s email address. Either only allows the recipient to view the details or allows them to view and edit them.
- The name of the email address shared will drop down in the list when you select Share. Multiple people can be added to this list with different permissions as to whether they can edit it or not.
Note: When an email recipient is listed, the Trash icon will let you modify their permissions or delete their name from the list.